


Hello everyone! Let's learn about AWS Copilot CLI. An amazing tool that lets you set up, scale and operate container based web application in the cloud. In this step-by-step tutorial, we will take a look at how to set up a Production ready Wordpress web site by using Copilot CLI.
Prerequisites
AWS Copilot CLI. To learn more, read this article.
An AWS account. If you don't have one, sign up here.
Docker installed in your machine. If not, install here
The AWS Reference Architecture for Wordpress is quite similar to what Copilot already deploys as part of its default environment config
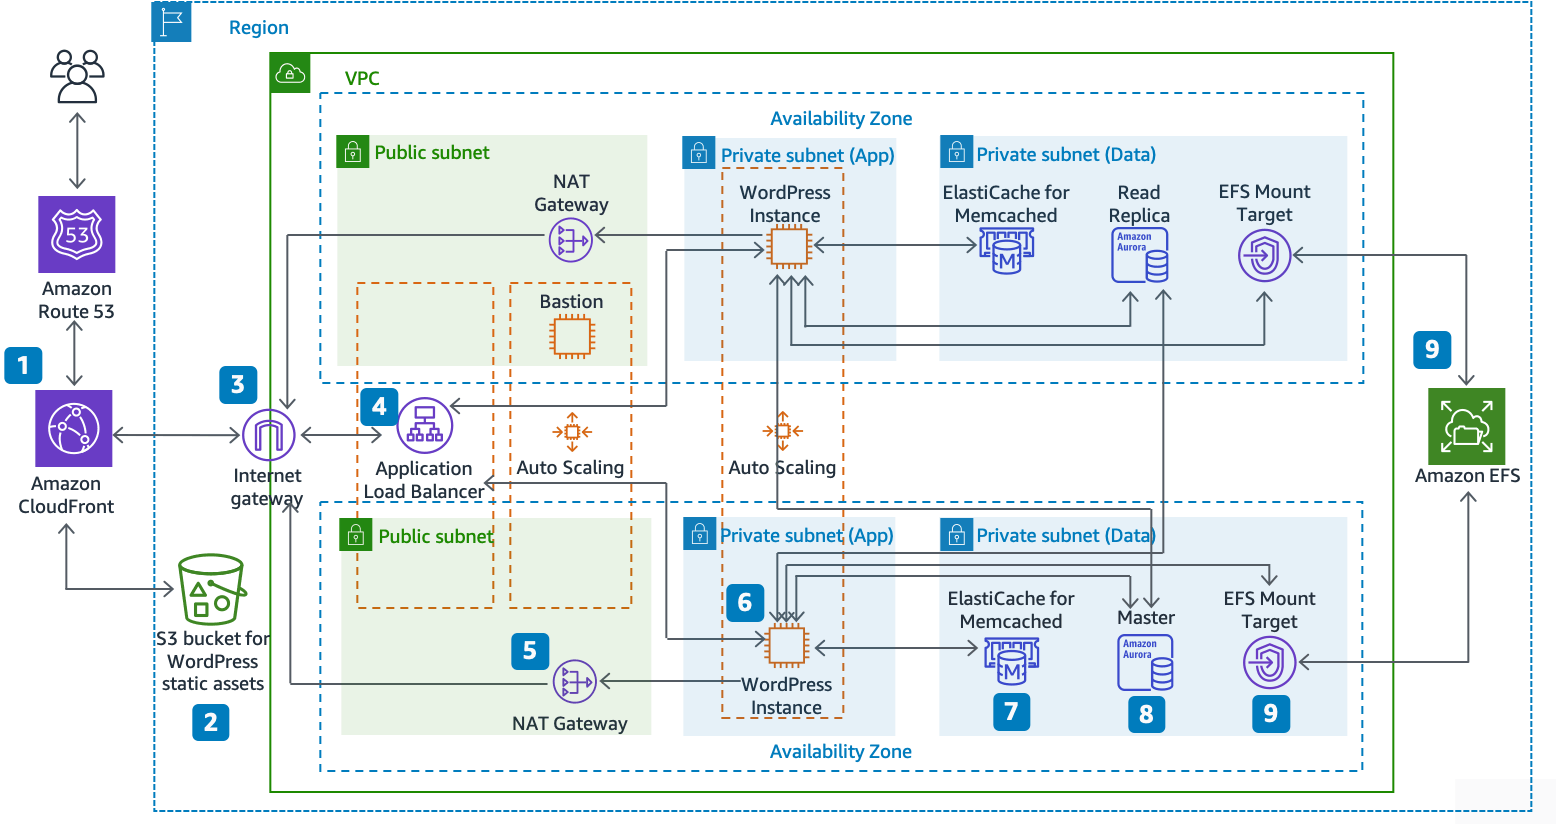
To deploy this architecture come deep dive with me.
first initialize a fresh git repository with
git init
Then set up a Copilot application. An application is a collection of environments which run your ECS services.
copilot app init wordpress
If you have a custom domain in your account, you can use it and Copilot will automatically provision ACM certificates and set up hosted zones for each environment. Your services will be accessible at https://{svc}.{env}.{app}.domain.com. Just run:
copilot app init --domain mydomain.com wordpress
Deploy an environment
copilot env init -n test --default-config --profile default
An environment is a collection of networking resources including a VPC, public and private subnets, an ECS Cluster, and (when necessary) an Application Load Balancer to serve traffic to your containers. Creating an environment is a prerequisite to deploying a service with Copilot.
Lets Docker it!!
Create a Dockerfile with the following content:
FROM ubuntu:latest as installer
RUN apt-get update && apt-get install curl --yes
RUN curl -Lo /usr/local/bin/jq https://github.com/stedolan/jq/releases/download/jq-1.5/jq-linux64
RUN chmod +0755 /usr/local/bin/jq

FROM public.ecr.aws/bitnami/wordpress:latest as app
COPY --from=installer /usr/local/bin/jq /usr/bin/jq
COPY startup.sh /opt/copilot/scripts/startup.sh
ENTRYPOINT ["/bin/sh", "-c"]
CMD ["/opt/copilot/scripts/startup.sh"]
EXPOSE 8080
This dockerfile will installs jq into the Bitnami wordpress image, and wraps the startup logic in a script which will help us make ECS and Copilot work with Wordpress.
You'll also need the startup.sh script mentioned in the Dockerfile.
#!/bin/bash

# Exit if the secret wasn't populated by the ECS agent
[ -z $WP_SECRET ] && echo "Secret WP_SECRET not populated in environment" && exit 1

export WORDPRESS_DATABASE_HOST=`echo $WP_SECRET | jq -r '.host'`
export WORDPRESS_DATABASE_PORT_NUMBER=`echo $WP_SECRET | jq -r .port`
export WORDPRESS_DATABASE_NAME=`echo $WP_SECRET | jq -r .dbname`
export WORDPRESS_DATABASE_USER=`echo $WP_SECRET | jq -r .username`
export WORDPRESS_DATABASE_PASSWORD=`echo $WP_SECRET | jq -r .password`

/opt/bitnami/scripts/wordpress/entrypoint.sh /opt/bitnami/scripts/apache/run.sh
This script simply converts a JSON environment variable into the variables this Wordpress image expects, then calls the entrypoint logic.
Then, we run:
copilot svc init -t "Load Balanced Web Service" --dockerfile ./Dockerfile --port 8080 --name fe
This will register a new service with Copilot so that it can easily be deployed to your new environment. It will write a manifest file at copilot/fe/manifest.yml containing simple, opinionated, extensible configuration for your service.
Set up EFS
Wordpress needs a database to store uploaded user content, themes, plugins, and some configuration files. We can do this with Copilot's built-in managed EFS capability.
Modify the newly created manifest at copilot/fe/manifest.yml (or use the one provided with this repository) so that it includes the following lines:
storage:
  volumes:
    wp-content:
      path: /bitnami/wordpress
      read_only: false
      efs: true
This tells Copilot to create a filesystem in your environment, create a dedicated sub-directory for your service in that filesystem, and use that directory to store everything the wordpress installation needs.
Customize your healthcheck configuration
The Load Balancer needs some specific settings enabled in order to work with wordpress. The stickiness key is crucial so redirects work as expected.
Modify the http section of your manifest to the following:
http:
  # Requests to this path will be forwarded to your service.
  # To match all requests you can use the "/" path.
  path: '/'
  # You can specify a custom health check path. The default is "/".
  healthcheck:
    path: /
    success_codes: '200-399'
    interval: 60s
    timeout: 5s
    healthy_threshold: 3
    unhealthy_threshold: 5
  stickiness: true
Configure Autoscaling
If you wish to have your service scale with traffic, you can add the following to the count section of the manifest. Instead of a single number, you'll specify count as a map. This config will launch up to 2 copies of your service on dedicated Fargate capacity. Then, if traffic causes scaling events up to 3 or 4 copies, ECS will attempt to place those tasks on Fargate Spot, saving you nearly 75% over on-demand pricing.
count:         # Number of tasks that should be running in your service.
  range:
    min: 1
    max: 4
    spot_from: 3
  cpu_percentage: 75
Set up your database for wordpress.
Wordpress also needs a database. We can set this up with Copilot's storage init command, which takes advantage of the Additional Resources functionality to simplify your experience configuring serverless databases.
copilot storage init -n wp -t Aurora --initial-db main --engine MySQL -w fe
The Cloudformation template which this command creates at copilot/fe/addons/wp.yml will create a serverless, autoscaling MySQL cluster named wp and an initial table called main. We'll set up Wordpress to work with this database.
It will also create a secret which contains metadata about your cluster. This secret is injected into your containers in the next step as an environment variable called WP_SECRET and has the following structure:
{
  "username": "user",
  "password": "r@nd0MP4$$W%rd",
  "host": "database-url.eu-central-1.amazonaws.com",
  "port": "3306",
  "dbname": "main"
}
We'll convert this data into variables wordpress can use via the startup.sh script which we wrap around our wordpress image in the Dockerfile.
Customize Wordpress initialization options
The Bitnami wordpress image has some environment variables you can set to initialize your administrator user and password, your site's name and description, etc. You can read more about these variables here
To customize these variables, modify the variables section of your manifest:
variables:
  WORDPRESS_USERNAME: admin
  WORDPRESS_BLOG_NAME: My Blog
Deploy your wordpress container
Now that we've set up the manifest correctly and run storage init to create our database, we can deploy the service to our test environment.
copilot svc deploy -n fe
This step will likely take 15 minutes, as the EFS filesystem, database cluster, ECS service, and Application Load Balancer are created.
Log in to your new wordpress site!
Navigate to the load balancer URL that Copilot outputs after svc deploy finishes to see your new wordpress site. You can log in with the default username and password (user/bitnami) by navigating to ${LB_URL}/login/.
Teardown
Delete your application
copilot app delete
Wanna Deploy Lighting Fast ?
I heard all yesss :) go with below example
git clone git@github.com:selcukkubur/copilot-easypress.git && cd copilot-easypress
and run the below command , or make it your own. Keep in your mind before run command verify you have configured AWS CLI for your AWS Account like
export=AWS_PROFILE=yourprofilename
copilot init \
  --type 'Load Balanced Web Service' \
  --app wordpress \
  --name fe \
  --dockerfile ./Dockerfile \
  --deploy
here is cli output history in case of you wonder.

Thanks for reading! I hope it has been a helpful introduction to AWS COPILOT. If you find this article helpful, be sure to like and share it around for more reach. To learn more about Copilot CLI and its amazing features, please check out the References section below. Cheers!